https://tech.meituan.com/java-hashmap.html
摘要
HashMap是Java程序员使用频率最高的用于映射(键值对)处理的数据类型。随着JDK(Java Developmet Kit)版本的更新,JDK1.8对HashMap底层的实现进行了优化,例如引入红黑树的数据结构和扩容的优化等。本文结合JDK1.7和JDK1.8的区别,深入探讨HashMap的结构实现和功能原理。
简介
Java为数据结构中的映射定义了一个接口java.util.Map,此接口主要有四个常用的实现类,分别是HashMap、Hashtable、LinkedHashMap和TreeMap,类继承关系如下图所示:
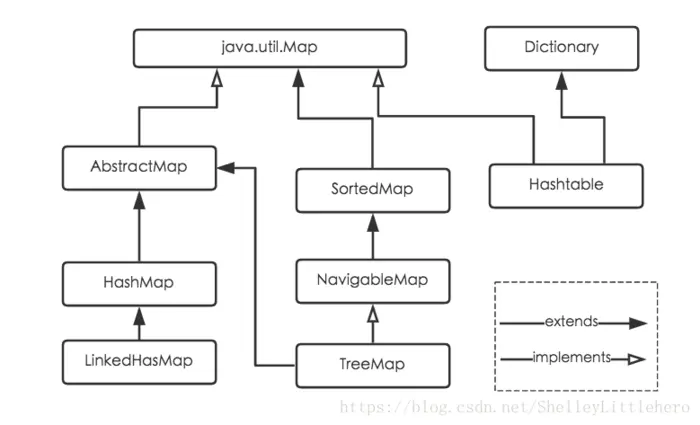
下面针对各个实现类的特点做一些说明:
(1) HashMap:它根据键的hashCode值存储数据,大多数情况下可以直接定位到它的值,因而具有很快的访问速度,但遍历顺序却是不确定的。 HashMap最多只允许一条记录的键为null,允许多条记录的值为null。HashMap非线程安全,即任一时刻可以有多个线程同时写HashMap,可能会导致数据的不一致。如果需要满足线程安全,可以用 Collections的synchronizedMap方法使HashMap具有线程安全的能力,或者使用ConcurrentHashMap。
(2) Hashtable:Hashtable是遗留类,很多映射的常用功能与HashMap类似,不同的是它承自Dictionary类,并且是线程安全的,任一时间只有一个线程能写Hashtable,并发性不如ConcurrentHashMap,因为ConcurrentHashMap引入了分段锁。Hashtable不建议在新代码中使用,不需要线程安全的场合可以用HashMap替换,需要线程安全的场合可以用ConcurrentHashMap替换。
(3) LinkedHashMap:LinkedHashMap是HashMap的一个子类,保存了记录的插入顺序,在用Iterator遍历LinkedHashMap时,先得到的记录肯定是先插入的,也可以在构造时带参数,按照访问次序排序。
(4) TreeMap:TreeMap实现SortedMap接口,能够把它保存的记录根据键排序,默认是按键值的升序排序,也可以指定排序的比较器,当用Iterator遍历TreeMap时,得到的记录是排过序的。如果使用排序的映射,建议使用TreeMap。在使用TreeMap时,key必须实现Comparable接口或者在构造TreeMap传入自定义的Comparator,否则会在运行时抛出java.lang.ClassCastException类型的异常。
对于上述四种Map类型的类,要求映射中的key是不可变对象。不可变对象是该对象在创建后它的哈希值不会被改变。如果对象的哈希值发生变化,Map对象很可能就定位不到映射的位置了。
通过上面的比较,我们知道了HashMap是Java的Map家族中一个普通成员,鉴于它可以满足大多数场景的使用条件,所以是使用频度最高的一个。下文我们主要结合源码,从存储结构、常用方法分析、扩容以及安全性等方面深入讲解HashMap的工作原理。
内部实现
搞清楚HashMap,首先需要知道HashMap是什么,即它的存储结构-字段;其次弄明白它能干什么,即它的功能实现-方法。下面我们针对这两个方面详细展开讲解。
存储结构-字段
从结构实现来讲,HashMap是数组+链表+红黑树(JDK1.8增加了红黑树部分)实现的,如下如所示。
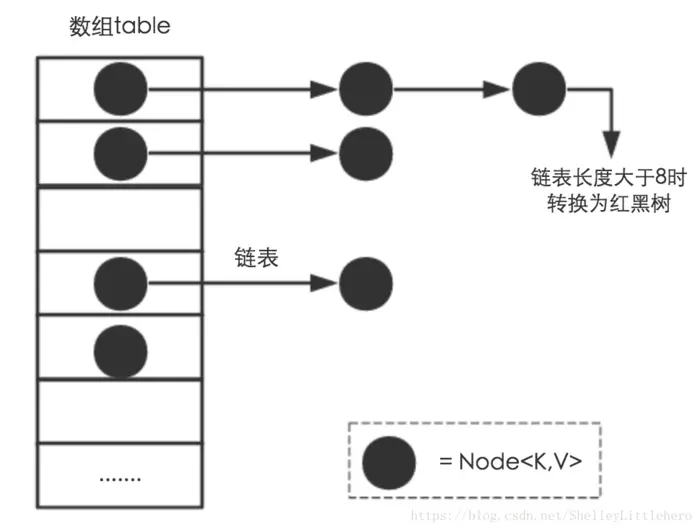
这里需要讲明白两个问题:数据底层具体存储的是什么?这样的存储方式有什么优点呢?
(1) 从源码可知,HashMap类中有一个非常重要的字段,就是 Node[] table,即哈希桶数组,明显它是一个Node的数组。我们来看Node[JDK1.8]是何物。
static class Node<K,V> implements Map.Entry<K,V> {
final int hash;
final K key;
V value;
Node<K,V> next;
Node(int hash, K key, V value, Node<K,V> next) { ... }
public final K getKey(){ ... }
public final V getValue() { ... }
public final String toString() { ... }
public final int hashCode() { ... }
public final V setValue(V newValue) { ... }
public final boolean equals(Object o) { ... }
}
Node是HashMap的一个内部类,实现了Map.Entry接口,本质是就是一个映射(键值对)。上图中的每个黑色圆点就是一个Node对象。
(2) HashMap就是使用哈希表来存储的。哈希表为解决冲突,可以采用开放地址法和链地址法等来解决问题,Java中HashMap采用了链地址法。链地址法,简单来说,就是数组加链表的结合。在每个数组元素上都一个链表结构,当数据被Hash后,得到数组下标,把数据放在对应下标元素的链表上。例如程序执行下面代码:
map.put("美团","小美");
系统将调用"美团"这个key的hashCode()方法得到其hashCode 值(该方法适用于每个Java对象),然后再通过Hash算法的后两步运算(高位运算和取模运算,下文有介绍)来定位该键值对的存储位置,有时两个key会定位到相同的位置,表示发生了Hash碰撞。当然Hash算法计算结果越分散均匀,Hash碰撞的概率就越小,map的存取效率就会越高。
如果哈希桶数组很大,即使较差的Hash算法也会比较分散,如果哈希桶数组数组很小,即使好的Hash算法也会出现较多碰撞,所以就需要在空间成本和时间成本之间权衡,其实就是在根据实际情况确定哈希桶数组的大小,并在此基础上设计好的hash算法减少Hash碰撞。那么通过什么方式来控制map使得Hash碰撞的概率又小,哈希桶数组(Node[] table)占用空间又少呢?答案就是好的Hash算法和扩容机制。
在理解Hash和扩容流程之前,我们得先了解下HashMap的几个字段。从HashMap的默认构造函数源码可知,构造函数就是对下面几个字段进行初始化,源码如下:
int threshold;
final float loadFactor;
int modCount;
int size;
首先,Node[] table的初始化长度length(默认值是16),Load factor为负载因子(默认值是0.75),threshold是HashMap所能容纳的最大数据量的Node(键值对)个数。threshold = length * Load factor。也就是说,在数组定义好长度之后,负载因子越大,所能容纳的键值对个数越多。
结合负载因子的定义公式可知,threshold就是在此Load factor和length(数组长度)对应下允许的最大元素数目,超过这个数目就重新resize(扩容),扩容后的HashMap容量是之前容量的两倍。默认的负载因子0.75是对空间和时间效率的一个平衡选择,建议大家不要修改,除非在时间和空间比较特殊的情况下,如果内存空间很多而又对时间效率要求很高,可以降低负载因子Load factor的值;相反,如果内存空间紧张而对时间效率要求不高,可以增加负载因子loadFactor的值,这个值可以大于1。
**size这个字段其实很好理解,就是HashMap中实际存在的键值对数量。**注意和table的长度length、容纳最大键值对数量threshold的区别。而modCount字段主要用来记录HashMap内部结构发生变化的次数,主要用于迭代的快速失败(fast-fail)。强调一点,内部结构发生变化指的是结构发生变化,例如put新键值对,但是某个key对应的value值被覆盖不属于结构变化。
在HashMap中,哈希桶数组table的长度length大小必须为2的n次方(一定是合数),这是一种非常规的设计,常规的设计是把桶的大小设计为素数。相对来说素数导致冲突的概率要小于合数,具体证明可以参考http://blog.csdn.net/liuqiyao_01/article/details/14475159,
Hashtable初始化桶大小为11,就是桶大小设计为素数的应用(Hashtable扩容后不能保证还是素数)。HashMap采用这种非常规设计,主要是为了在取模和扩容时做优化,同时为了减少冲突,HashMap定位哈希桶索引位置时,也加入了高位参与运算的过程。
(补充:)为什么hashMap的数组长度一定要是16或者是2的n次方呢?
原因在于: 以数组的长度为16为例,length-1之后为15,其二进制数为1111,与key的经过hashcode算法的值进行&运算,1111不会对hashcode(key)的末尾产生影响,这样的话,只要hashcode算法足够优秀,足够分布,就能保证hash算法的结果足够均匀.
这里存在一个问题,即使负载因子和Hash算法设计的再合理,也免不了会出现拉链过长的情况,一旦出现拉链过长,则会严重影响HashMap的性能。于是,在JDK1.8版本中,对数据结构做了进一步的优化,引入了红黑树。而当链表长度太长(默认超过8)时,链表就转换为红黑树,利用红黑树快速增删改查的特点提高HashMap的性能,其中会用到红黑树的插入、删除、查找等算法。本文不再对红黑树展开讨论,想了解更多红黑树数据结构的工作原理可以参考http://blog.csdn.net/v_july_v/article/details/6105630。
功能实现-方法
HashMap的内部功能实现很多,本文主要从根据key获取哈希桶数组索引位置、put方法的详细执行、扩容过程三个具有代表性的点深入展开讲解。
1. 确定哈希桶数组索引位置
不管增加、删除、查找键值对,定位到哈希桶数组的位置都是很关键的第一步。前面说过HashMap的数据结构是数组和链表的结合,所以我们当然希望这个HashMap里面的元素位置尽量分布均匀些,尽量使得每个位置上的元素数量只有一个,那么当我们用hash算法求得这个位置的时候,马上就可以知道对应位置的元素就是我们要的,不用遍历链表,大大优化了查询的效率。HashMap定位数组索引位置,直接决定了hash方法的离散性能。先看看源码的实现(方法一+方法二):
方法一:
static final int hash(Object key) {
int h;
return (key == null) ? 0 : (h = key.hashCode()) ^ (h >>> 16);
}
方法二:
static int indexFor(int h, int length) {
return h & (length-1);
}
这里的Hash算法本质上就是三步:取key的hashCode值、高位运算、取模运算。
对于任意给定的对象,只要它的hashCode()返回值相同,那么程序调用方法一所计算得到的Hash码值总是相同的。我们首先想到的就是把hash值对数组长度取模运算,这样一来,元素的分布相对来说是比较均匀的。但是,模运算的消耗还是比较大的,在HashMap中是这样做的:调用方法二来计算该对象应该保存在table数组的哪个索引处。
这个方法非常巧妙,它通过h & (table.length -1)来得到该对象的保存位,而HashMap底层数组的长度总是2的n次方,这是HashMap在速度上的优化。当length总是2的n次方时,h& (length-1)运算等价于对length取模,也就是h%length,但是&比%具有更高的效率。(参考:http://yananay.iteye.com/blog/910460 和 https://www.zhihu.com/question/28562088)
在JDK1.8的实现中,优化了高位运算的算法,通过hashCode()的高16位异或低16位实现的:(h = k.hashCode()) ^ (h >>> 16),主要是从速度、功效、质量来考虑的,这么做可以在数组table的length比较小的时候,也能保证考虑到高低Bit都参与到Hash的计算中,同时不会有太大的开销。
下面举例说明下,n为table的长度。

2. 分析HashMap的put方法
HashMap的put方法执行过程可以通过下图来理解,自己有兴趣可以去对比源码更清楚地研究学习。
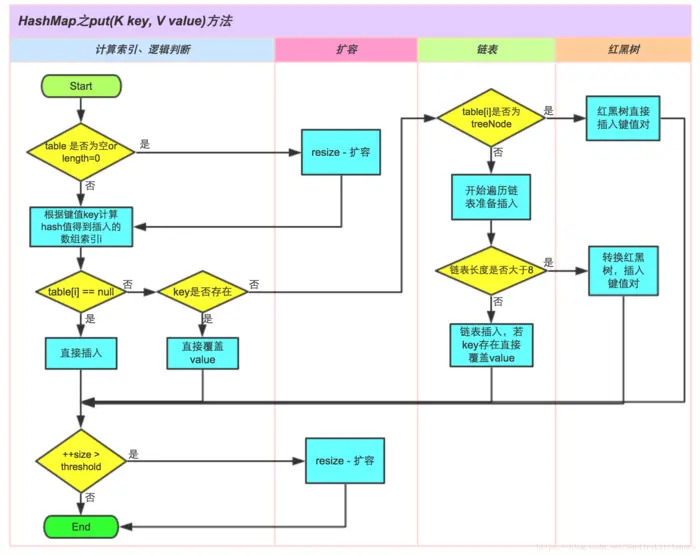
①.判断键值对数组table[i]是否为空或为null,否则执行resize()进行扩容;
②.根据键值key计算hash值得到插入的数组索引i,如果table[i]==null,直接新建节点添加,转向⑥,如果table[i]不为空,转向③;
③.判断table[i]的首个元素是否和key一样,如果相同直接覆盖value,否则转向④,这里的相同指的是hashCode以及equals;
④.判断table[i] 是否为treeNode,即table[i] 是否是红黑树,如果是红黑树,则直接在树中插入键值对,否则转向⑤;
⑤.遍历table[i],判断链表长度是否大于8,大于8的话把链表转换为红黑树,在红黑树中执行插入操作,否则进行链表的插入操作;遍历过程中若发现key已经存在直接覆盖value即可;
⑥.插入成功后,判断实际存在的键值对数量size是否超多了最大容量threshold,如果超过,进行扩容。
hashMap的put()使用的是头插法,即index相同的元素,后来者占据数据的位置,之前的元以链表的方式放在后来元素的后面.之所以这样设计是因为 hashMap的设计者认为后来的元素被查找的可能性更大.
JDK1.8HashMap的put方法源码如下:
1 public V put(K key, V value) {
2
3 return putVal(hash(key), key, value, false, true);
4 }
5
6 final V putVal(int hash, K key, V value, boolean onlyIfAbsent,
7 boolean evict) {
8 Node<K,V>[] tab; Node<K,V> p; int n, i;
9
10 if ((tab = table) == null || (n = tab.length) == 0)
11 n = (tab = resize()).length;
12
13 if ((p = tab[i = (n - 1) & hash]) == null)
14 tab[i] = newNode(hash, key, value, null);
15 else {
16 Node<K,V> e; K k;
17
18 if (p.hash == hash &&
19 ((k = p.key) == key || (key != null && key.equals(k))))
20 e = p;
21
22 else if (p instanceof TreeNode)
23 e = ((TreeNode<K,V>)p).putTreeVal(this, tab, hash, key, value);
24
25 else {
26 for (int binCount = 0; ; ++binCount) {
27 if ((e = p.next) == null) {
28 p.next = newNode(hash, key,value,null);
29 if (binCount >= TREEIFY_THRESHOLD - 1)
30 treeifyBin(tab, hash);
31 break;
32 }
33 if (e.hash == hash &&
34 ((k = e.key) == key || (key != null && key.equals(k))))
35 break;
36 p = e;
37 }
38 }
39
40 if (e != null) {
41 V oldValue = e.value;
42 if (!onlyIfAbsent || oldValue == null)
43 e.value = value;
44 afterNodeAccess(e);
45 return oldValue;
46 }
47 }
48 ++modCount;
49
50 if (++size > threshold)
51 resize();
52 afterNodeInsertion(evict);
53 return null;
54 }
3.扩容机制
扩容(resize)就是重新计算容量,向HashMap对象里不停的添加元素,而HashMap对象内部的数组无法装载更多的元素时,对象就需要扩大数组的长度,以便能装入更多的元素。**当然Java里的数组是无法自动扩容的,方法是使用一个新的数组代替已有的容量小的数组,**就像我们用一个小桶装水,如果想装更多的水,就得换大水桶。
我们分析下resize的源码,鉴于JDK1.8融入了红黑树,较复杂,为了便于理解我们仍然使用JDK1.7的代码,好理解一些,本质上区别不大,具体区别后文再说。
1 void resize(int newCapacity) {
2 Entry[] oldTable = table;
3 int oldCapacity = oldTable.length;
4 if (oldCapacity == MAXIMUM_CAPACITY) {
5 threshold = Integer.MAX_VALUE;
6 return;
7 }
8
9 Entry[] newTable = new Entry[newCapacity];
10 transfer(newTable);
11 table = newTable;
12 threshold = (int)(newCapacity * loadFactor);
13 }
这里就是使用一个容量更大的数组来代替已有的容量小的数组,transfer()方法将原有Entry数组的元素拷贝到新的Entry数组里。
1 void transfer(Entry[] newTable) {
2 Entry[] src = table;
3 int newCapacity = newTable.length;
4 for (int j = 0; j < src.length; j++) {
5 Entry<K,V> e = src[j];
6 if (e != null) {
7 src[j] = null;
8 do {
9 Entry<K,V> next = e.next;
10 int i = indexFor(e.hash, newCapacity);
11 e.next = newTable[i];
12 newTable[i] = e;
13 e = next;
14 } while (e != null);
15 }
16 }
17 }
newTable[i]的引用赋给了e.next,也就是使用了单链表的头插入方式,同一位置上新元素总会被放在链表的头部位置(注意不是放在链表的尾部);这样先放在一个索引上的元素终会被放到Entry链的尾部(如果发生了hash冲突的话),这一点和Jdk1.8有区别,下文详解。在旧数组中同一条Entry链上的元素,通过重新计算索引位置后,有可能被放到了新数组的不同位置上。
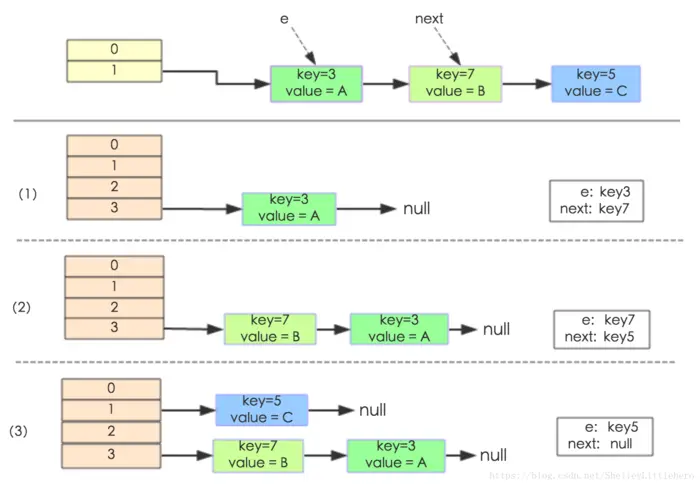
下面举个例子说明下扩容过程。假设了我们的hash算法就是简单的用key mod 一下表的大小(也就是数组的长度)。其中的哈希桶数组table的size=2, 所以key = 3、7、5,put顺序依次为 5、7、3。在mod 2以后都冲突在table[1]这里了。这里假设负载因子 loadFactor=1,即当键值对的实际大小size 大于 table的实际大小时进行扩容。接下来的三个步骤是哈希桶数组 resize成4,然后所有的Node重新rehash的过程。
下面我们讲解下JDK1.8做了哪些优化。经过观测可以发现,我们使用的是2次幂的扩展(指长度扩为原来2倍),所以,元素的位置要么是在原位置,要么是在原位置再移动2次幂的位置。看下图可以明白这句话的意思,n为table的长度,图(a)表示扩容前的key1和key2两种key确定索引位置的示例,图(b)表示扩容后key1和key2两种key确定索引位置的示例,其中hash1是key1对应的哈希与高位运算结果。

元素在重新计算hash之后,因为n变为2倍,那么n-1的mask范围在高位多1bit(红色),因此新的index就会发生这样的变化:

因此,我们在扩充HashMap的时候,不需要像JDK1.7的实现那样重新计算hash,只需要看看原来的hash值新增的那个bit是1还是0就好了,是0的话索引没变,是1的话索引变成“原索引+oldCap”,可以看看下图为16扩充为32的resize示意图:
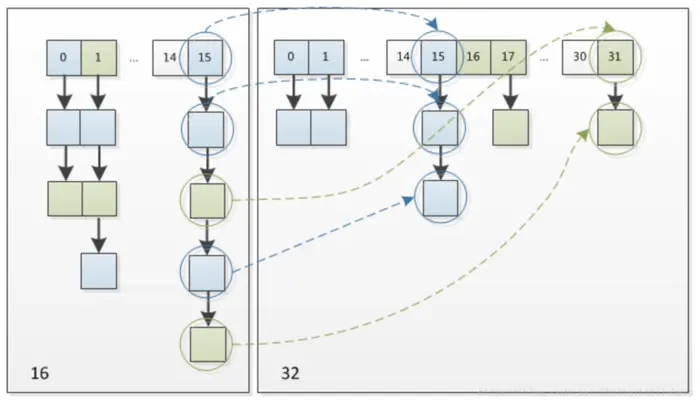
这个设计确实非常的巧妙,既省去了重新计算hash值的时间,而且同时,由于新增的1bit是0还是1可以认为是随机的,因此resize的过程,均匀的把之前的冲突的节点分散到新的bucket了。这一块就是JDK1.8新增的优化点。有一点注意区别,JDK1.7中rehash的时候,旧链表迁移新链表的时候,如果在新表的数组索引位置相同,则链表元素会倒置,但是从上图可以看出,JDK1.8不会倒置。有兴趣的同学可以研究下JDK1.8的resize源码,写的很赞,如下:
1 final Node<K,V>[] resize() {
2 Node<K,V>[] oldTab = table;
3 int oldCap = (oldTab == null) ? 0 : oldTab.length;
4 int oldThr = threshold;
5 int newCap, newThr = 0;
6 if (oldCap > 0) {
7
8 if (oldCap >= MAXIMUM_CAPACITY) {
9 threshold = Integer.MAX_VALUE;
10 return oldTab;
11 }
12
13 else if ((newCap = oldCap << 1) < MAXIMUM_CAPACITY &&
14 oldCap >= DEFAULT_INITIAL_CAPACITY)
15 newThr = oldThr << 1;
16 }
17 else if (oldThr > 0)
18 newCap = oldThr;
19 else {
20 newCap = DEFAULT_INITIAL_CAPACITY;
21 newThr = (int)(DEFAULT_LOAD_FACTOR * DEFAULT_INITIAL_CAPACITY);
22 }
23
24 if (newThr == 0) {
25
26 float ft = (float)newCap * loadFactor;
27 newThr = (newCap < MAXIMUM_CAPACITY && ft < (float)MAXIMUM_CAPACITY ?
28 (int)ft : Integer.MAX_VALUE);
29 }
30 threshold = newThr;
31 @SuppressWarnings({"rawtypes","unchecked"})
32 Node<K,V>[] newTab = (Node<K,V>[])new Node[newCap];
33 table = newTab;
34 if (oldTab != null) {
35
36 for (int j = 0; j < oldCap; ++j) {
37 Node<K,V> e;
38 if ((e = oldTab[j]) != null) {
39 oldTab[j] = null;
40 if (e.next == null)
41 newTab[e.hash & (newCap - 1)] = e;
42 else if (e instanceof TreeNode)
43 ((TreeNode<K,V>)e).split(this, newTab, j, oldCap);
44 else {
45 Node<K,V> loHead = null, loTail = null;
46 Node<K,V> hiHead = null, hiTail = null;
47 Node<K,V> next;
48 do {
49 next = e.next;
50
51 if ((e.hash & oldCap) == 0) {
52 if (loTail == null)
53 loHead = e;
54 else
55 loTail.next = e;
56 loTail = e;
57 }
58
59 else {
60 if (hiTail == null)
61 hiHead = e;
62 else
63 hiTail.next = e;
64 hiTail = e;
65 }
66 } while ((e = next) != null);
67
68 if (loTail != null) {
69 loTail.next = null;
70 newTab[j] = loHead;
71 }
72
73 if (hiTail != null) {
74 hiTail.next = null;
75 newTab[j + oldCap] = hiHead;
76 }
77 }
78 }
79 }
80 }
81 return newTab;
82 }
线程安全性
在多线程使用场景中,应该尽量避免使用线程不安全的HashMap,而使用线程安全的ConcurrentHashMap。那么为什么说HashMap是线程不安全的,下面举例子说明在并发的多线程使用场景中使用HashMap可能造成死循环。代码例子如下(便于理解,仍然使用JDK1.7的环境):
public class HashMapInfiniteLoop {

    private static HashMap<Integer,String> map = new HashMap<Integer,String>(2,0.75f);
    public static void main(String[] args) {
        map.put(5, "C");

        new Thread("Thread1") {
            public void run() {
                map.put(7, "B");
                System.out.println(map);
            };
        }.start();
        new Thread("Thread2") {
            public void run() {
                map.put(3, "A);
                System.out.println(map);
            };
        }.start();
    }
}
其中,map初始化为一个长度为2的数组,loadFactor=0.75,threshold=2*0.75=1(?),也就是说当put第二个key的时候,map就需要进行resize。
通过设置断点让线程1和线程2同时debug到transfer方法(3.3小节代码块)的首行。注意此时两个线程已经成功添加数据。放开thread1的断点至transfer方法的“Entry next = e.next;” 这一行;然后放开线程2的的断点,让线程2进行resize。结果如下图。
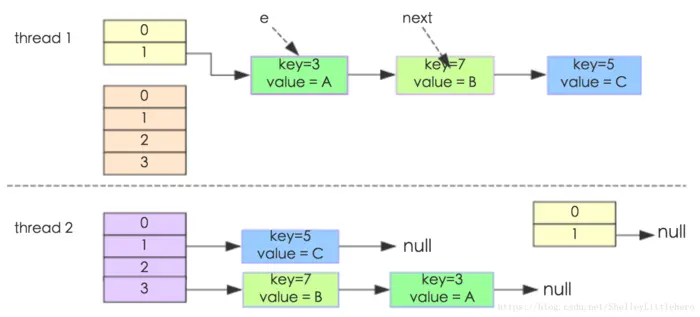
注意,Thread1的 e 指向了key(3),而next指向了key(7),其在线程二rehash后,指向了线程二重组后的链表。
线程一被调度回来执行,先是执行 newTalbe[i] = e, 然后是e = next,导致了e指向了key(7),而下一次循环的next = e.next导致了next指向了key(3)。
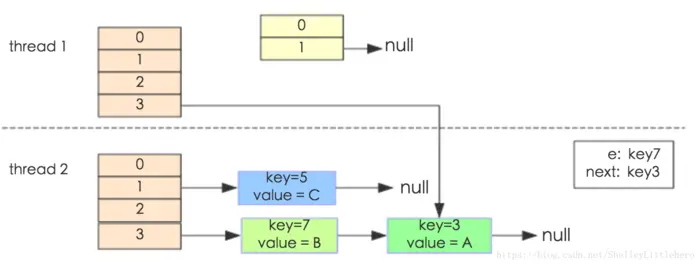
e.next = newTable[i] 导致 key(3).next 指向了 key(7)。注意:此时的key(7).next 已经指向了key(3), 环形链表就这样出现了。
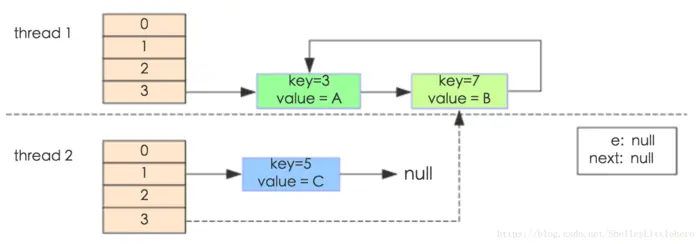
于是,当我们用线程一调用map.get(11)时,悲剧就出现了——Infinite Loop。
JDK1.8与JDK1.7的性能对比
HashMap中,如果key经过hash算法得出的数组索引位置全部不相同,即Hash算法非常好,那样的话,getKey方法的时间复杂度就是O(1),如果Hash算法技术的结果碰撞非常多,假如Hash算极其差,所有的Hash算法结果得出的索引位置一样,那样所有的键值对都集中到一个桶中,或者在一个链表中,或者在一个红黑树中,时间复杂度分别为O(n)和O(lgn)。 鉴于JDK1.8做了多方面的优化,总体性能优于JDK1.7,下面我们从两个方面用例子证明这一点。
Hash较均匀的情况
为了便于测试,我们先写一个类Key,如下:
class Key implements Comparable<Key> {

    private final int value;

    Key(int value) {
        this.value = value;
    }

    @Override
    public int compareTo(Key o) {
        return Integer.compare(this.value, o.value);
    }

    @Override
    public boolean equals(Object o) {
        if (this == o) return true;
        if (o == null || getClass() != o.getClass())
            return false;
        Key key = (Key) o;
        return value == key.value;
    }

    @Override
    public int hashCode() {
        return value;
    }
}
这个类复写了equals方法,并且提供了相当好的hashCode函数,任何一个值的hashCode都不会相同,因为直接使用value当做hashcode。为了避免频繁的GC,我将不变的Key实例缓存了起来,而不是一遍一遍的创建它们。代码如下:
public class Keys {

    public static final int MAX_KEY = 10_000_000;
    private static final Key[] KEYS_CACHE = new Key[MAX_KEY];

    static {
        for (int i = 0; i < MAX_KEY; ++i) {
            KEYS_CACHE[i] = new Key(i);
        }
    }

    public static Key of(int value) {
        return KEYS_CACHE[value];
    }
}
现在开始我们的试验,测试需要做的仅仅是,创建不同size的HashMap(1、10、100、…10000000),屏蔽了扩容的情况,代码如下:
static void test(int mapSize) {
HashMap<Key, Integer> map = new HashMap<Key,Integer>(mapSize);
for (int i = 0; i < mapSize; ++i) {
map.put(Keys.of(i), i);
}
long beginTime = System.nanoTime();
for (int i = 0; i < mapSize; i++) {
map.get(Keys.of(i));
}
long endTime = System.nanoTime();
System.out.println(endTime - beginTime);
}
public static void main(String[] args) {
for(int i=10;i<= 1000 0000;i*= 10){
test(i);
}
}
在测试中会查找不同的值,然后度量花费的时间,为了计算getKey的平均时间,我们遍历所有的get方法,计算总的时间,除以key的数量,计算一个平均值,主要用来比较,绝对值可能会受很多环境因素的影响。结果如下:

通过观测测试结果可知,JDK1.8的性能要高于JDK1.7 15%以上,在某些size的区域上,甚至高于100%。由于Hash算法较均匀,JDK1.8引入的红黑树效果不明显,下面我们看看Hash不均匀的的情况。
Hash极不均匀的情况
假设我们又一个非常差的Key,它们所有的实例都返回相同的hashCode值。这是使用HashMap最坏的情况。代码修改如下:
class Key implements Comparable<Key> {
@Override
public int hashCode() {
return 1;
}
}
仍然执行main方法,得出的结果如下表所示:

从表中结果中可知,随着size的变大,JDK1.7的花费时间是增长的趋势,而JDK1.8是明显的降低趋势,并且呈现对数增长稳定。当一个链表太长的时候,HashMap会动态的将它替换成一个红黑树,这话的话会将时间复杂度从O(n)降为O(logn)。hash算法均匀和不均匀所花费的时间明显也不相同,这两种情况的相对比较,可以说明一个好的hash算法的重要性。
小结
(1) 扩容是一个特别耗性能的操作,所以当程序员在使用HashMap的时候,估算map的大小,初始化的时候给一个大致的数值,避免map进行频繁的扩容。
(2) 负载因子是可以修改的,也可以大于1,但是建议不要轻易修改,除非情况非常特殊。
(3) HashMap是线程不安全的,不要在并发的环境中同时操作HashMap,建议使用ConcurrentHashMap。
(4) JDK1.8引入红黑树大程度优化了HashMap的性能。
(5) 还没升级JDK1.8的,现在开始升级吧。HashMap的性能提升仅仅是JDK1.8的冰山一角。
参考
1.JDK1.7&JDK1.8 源码。
2.CSDN博客频道,HashMap多线程死循环问题,2014。
3.红黑联盟,Java类集框架之HashMap(JDK1.8)源码剖析,2015。
4.CSDN博客频道, 教你初步了解红黑树,2010。
5.Java Code Geeks,HashMap performance improvements in Java 8,2014。
6.Importnew,危险!在HashMap中将可变对象用作Key,2014。
7.CSDN博客频道,为什么一般hashtable的桶数会取一个素数,2013。
官方说明
Hash table based implementation of the Map interface. This implementation provides all of the optional map operations, and permits null values and the null key. (The HashMap class is roughly equivalent to Hashtable, except that it is unsynchronized and permits nulls.) This class makes no guarantees as to the order of the map; in particular, it does not guarantee that the order will remain constant over time.
HashMap类大致相当于Hashtable,除了它是不同步的并且允许空值
This implementation provides constant-time performance for the basic operations (get and put), assuming the hash function disperses the elements properly among the buckets. Iteration over collection views requires time proportional to the “capacity” of the HashMap instance (the number of buckets) plus its size (the number of key-value mappings). Thus, it’s very important not to set the initial capacity too high (or the load factor too low) if iteration performance is important.
An instance of HashMap has two parameters that affect its performance: initial capacity and load factor. The capacity is the number of buckets in the hash table, and the initial capacity is simply the capacity at the time the hash table is created. The load factor is a measure of how full the hash table is allowed to get before its capacity is automatically increased. When the number of entries in the hash table exceeds the product of the load factor and the current capacity, the hash table is rehashed (that is, internal data structures are rebuilt) so that the hash table has approximately twice the number of buckets.
As a general rule, the default load factor (.75) offers a good tradeoff between time and space costs. Higher values decrease the space overhead but increase the lookup cost (reflected in most of the operations of the HashMap class, including get and put). The expected number of entries in the map and its load factor should be taken into account when setting its initial capacity, so as to minimize the number of rehash operations. If the initial capacity is greater than the maximum number of entries divided by the load factor, no rehash operations will ever occur.
If many mappings are to be stored in a HashMap instance, creating it with a sufficiently large capacity will allow the mappings to be stored more efficiently than letting it perform automatic rehashing as needed to grow the table. Note that using many keys with the same hashCode() is a sure way to slow down performance of any hash table. To ameliorate impact, when keys are Comparable, this class may use comparison order among keys to help break ties.
Note that this implementation is not synchronized. If multiple threads access a hash map concurrently, and at least one of the threads modifies the map structurally, it must be synchronized externally. (A structural modification is any operation that adds or deletes one or more mappings; merely changing the value associated with a key that an instance already contains is not a structural modification.) This is typically accomplished by synchronizing on some object that naturally encapsulates the map. If no such object exists, the map should be “wrapped” using the Collections.synchronizedMap method. This is best done at creation time, to prevent accidental unsynchronized access to the map:
Map m = Collections.synchronizedMap(new HashMap(...));
The iterators returned by all of this class’s “collection view methods” are fail-fast: if the map is structurally modified at any time after the iterator is created, in any way except through the iterator’s own remove method, the iterator will throw a ConcurrentModificationException. Thus, in the face of concurrent modification, the iterator fails quickly and cleanly, rather than risking arbitrary, non-deterministic behavior at an undetermined time in the future.
Note that the fail-fast behavior of an iterator cannot be guaranteed as it is, generally speaking, impossible to make any hard guarantees in the presence of unsynchronized concurrent modification. Fail-fast iterators throw ConcurrentModificationException on a best-effort basis. Therefore, it would be wrong to write a program that depended on this exception for its correctness: the fail-fast behavior of iterators should be used only to detect bugs.